Rummage Sale Re-purposed and Up-cycled Plant Containers
June 19, 2018
In May, I was lucky enough to find a rummage sale with lots of items with up-cycling possibilities. Do you remember what I found? Details here.
This little dated country box with a wire handle was one of my finds. I think they used it as a potpourri box and also a pencil/pen box.
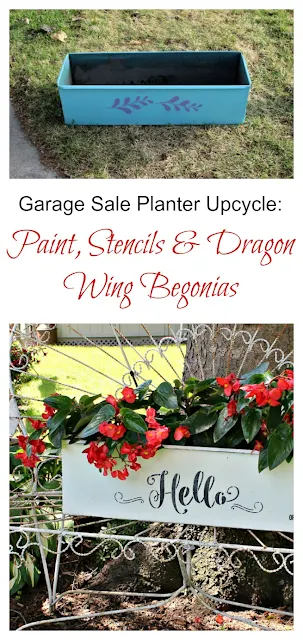
Another of my finds was this metal planter painted light blue with a mauve stencil.
Both finds get a makeover today on my blog!
First I brushed a coat of black latex paint on the box.
This will be my base coat.
Next, I gave the little box a coat or two of Chalked Paint in Chiffon Cream .
.
Now that I have brushed on the chalk paint top coat, I will "wet distress" the box edges quite a bit, and the interior areas some. My black base coat will show through and not get sanded off with this technique.
Wet distressing is easy! Take a wet tee shirt rag that has been wrung out and rub. Rub on the edges and other areas until the distressing is at your desired level.
Next I positioned this Hobby Lobby fern stencil on the front of my box.
It's too big for the box, so I will only use the top half of the stencil. I taped it on the box with blue painter's tape.
I used Ceramcoat Leaf Green for the fern stencil.
I used Ceramcoat black craft paint to stencil on the word "FERN" with FolkArt Adhesive Painting Stencils Old School Alphabet .
.
I sealed the chalk paint and stencils with Deco Art Americana Creme Wax in Clear , but you could also use clear paste wax or water based poly.
I sealed the chalk paint and stencils with Deco Art Americana Creme Wax in Clear
I added a couple of small faux fern frond picks to my upcycled "FERN" box.
Super easy! And cute?
Here is my new fern box displayed with vintage "made in Japan" rooster and hen salt and pepper shakers, and an ironstone dinner plate.
Above is my firkin style planter upcycle. Details HERE.
And below is my berry basket upcycle. Details HERE.
Now onto the garage sale metal planter box.
My husband did not really see a need to change it. It wasn't horrible... but just not my colors (at least anymore)!
First I spray painted the planter box with two coats of Krylon Chalky Finish Spray Paint in Classic White .
.
I then pulled out a stencil I had recently purchased at Michael's.
I then pulled out a stencil I had recently purchased at Michael's.
I taped the stencil onto the front of the window box with blue painter's tape, and stenciled it with Ceramcoat black craft paint.
I sanded the stenciling just a tiny bit with 220 grit sandpaper, and faux distressed the edges with my FolkArt Layering Wood Block , and Ceramcoat Walnut Noyer Craft paint.
The arrows point to the layering block faux distressing.
I sealed the chalk paint and stenciling with a couple coats of Water Based Helmsman Indoor/Outdoor Spar Urethane Aerosol in Satin .
.
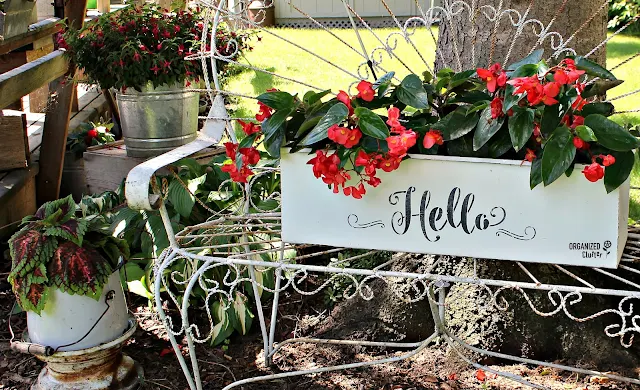
I then planted the upcycled window box with three Dragon Wing Begonias.
I placed the window box on my wrought iron peacock settee.
I hope you are inspired to up-cycle your garage sale finds!
It can be so fun!

Sharing is caring


Positively beautiful! :) I imagine your yard is like walking through a beautifully curated park. :) Thanks for the inspiration and a fun way to wake up!
ReplyDeleteChristina in SW FL
Your plantings and upcycled projects are adorable!! Do you work - how do you find time to make everything so pristine and beautiful - I am jealous! I love to garden and plant in "junk" and have quite a bit, but nowhere near what you have. I do work full time, so don't have as much free time as I would like but I do love plants and gardening. Thanks for all the wonderful inspiration!
ReplyDeleteTurned out so cute. Really love the Hello. Looks so cute on your bench.
ReplyDeleteGreat finds! I love how they turned out. The first one with the handle is my favorite.
ReplyDeleteTwo super cute upcycles...and you found the perfect places to display each one!
ReplyDeleteThanks for sharing,
Tammy