Vintage Milk Cans & Trying a New Distressing Technique
April 09, 2014
I love vintage milk cans!
Here is my vintage milk can #1. It has a wonderful all rust patina, and is a perfect accessory in my junk gardens...
I also used it here in my outdoor Christmas vignette.
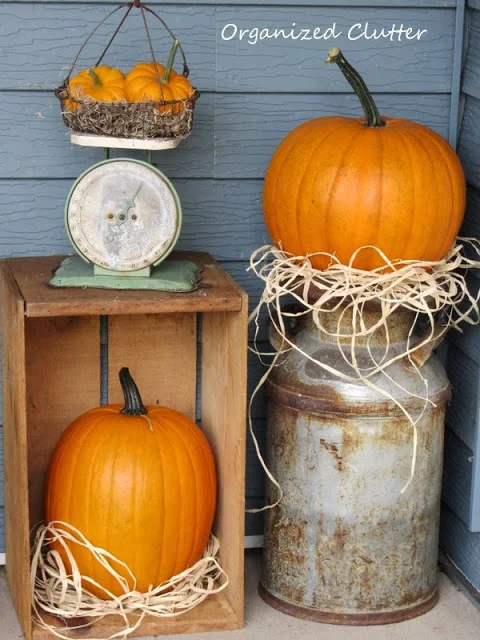
This is my milk can #2. This milk can has spent some time under my covered patio so it's a little less rusty than milk can #1, but equally at home in the garden...
Or, in a fall outdoor vignette.
At the right of the potting bench is my vintage milk can #3. This can was spray painted gold with blue trim when I found it. Now that it has weathered, I like it much better.
Here is my vintage milk can #4. It's just the top! I purchased it at a garage sale for $2.
This is milk can #5. I got this old can from my neighbors at the end of 2013, and it will be new to my gardens and vignettes in 2014.
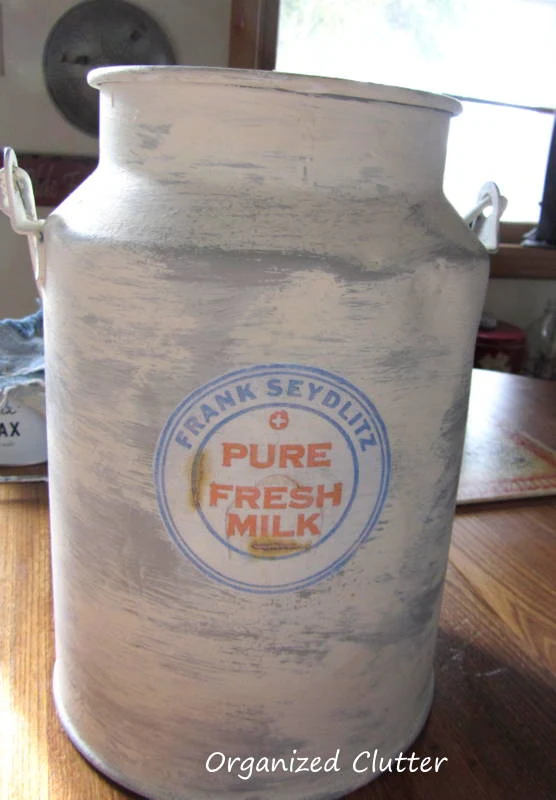
This is milk can #6, and also new to me. Besides a little dust, this 2 gallon can has a country paint job. It is an honest to goodness milk can, just smaller than the others. It is marked Security.
I really would have preferred the milk can to be unpainted, but rather stripping the paint, I opted to repaint it. First with a light gray latex base coat, and then a coat of Annie Sloane Chalk Paint in Old White.
Rather than sanding to distress the can, I used a wet rag sanding/distressing technique that I found here (and on several other blogs too). This technique would allow me to have a distressed paint finish without sanding and possibly sanding off my gray base coat revealing the old gold paint layer.
This is how my first attempt at wet rag sanding turned out. It really was pretty easy.
I then chose this milk cap graphic from Knick of Time Interiors for a milk can label. I used the Mod Podge image transfer method from Homeroad to add the label to the milk can.
The label is in place and it's time to wax with clear wax and then dark wax.
I will be using this milk can indoors since I painted it with chalk paint and paste waxed it. I'm glad I tried the wet sanding technique and that I have two additional milk cans!

Sharing is caring

.jpg)


+copy.png)


Cute cute! I would never hadc thought of using these in the garden. Love your little redo on the can.
ReplyDeleteBe a sweetie,
Shelia :)
that milk can graphic is just perfect!!
ReplyDeletemuch better!
ReplyDeleteLove the painted milk can. Thing is, my organized clutter never looks organized like yours does!
ReplyDeleteI have one just like it....except still with the tole painting....I need to fix that!
ReplyDeleteLove all of your milk cans, but I really love, love, love the one you painted and the label is the perfect touch.
ReplyDelete~Cindy
I love the milk cans and your lovely remake but mostly I must say that I love your 'junk' garden! I live in the desert and am not able to have many plants or greenery. I think adding items like you have would be perfect for my yard, very inspirational! Blessings, Cindy
ReplyDeleteI love all of your milk cans. The painted one turned out fabulous!
ReplyDeleteWhat a sweet collection of old milk cans. They are each very lovely! I love what you did with the painted one, very pretty!
ReplyDeleteHappy Thursday!
~Sherri
Looks great!!!
ReplyDeletePam
scrap-n-sewgranny.blogspot.com
That turned out so adorable, Carlene! I have a milk can that's been waiting for a makeover too. So glad you were able to use my milk cap graphic - it looks perfect on it!
ReplyDeleteI love the way your milk can turned out. I love milk cans and I have been thinking of painting one of mine a bright purple or blue to give one of my flower beds a bright pop of color, but I worry about ruining it, but then I think I'm never moving and I will never sell anymore of my milk cans so how could that ruin it if I like it, but I still have that little voice telling me not to paint it. Then I see your can and I think yes I need to paint it bright and put in the flower bed. I'm not as good as you are and that transfer was the perfect touch. Thank you for sharing.
ReplyDeleteI love your collection. I used to have several and I have no idea what happened to them but when I moved I "lost" a lot of things. Thank you for sharing those 2 techniques. It turned out so nice!
ReplyDelete