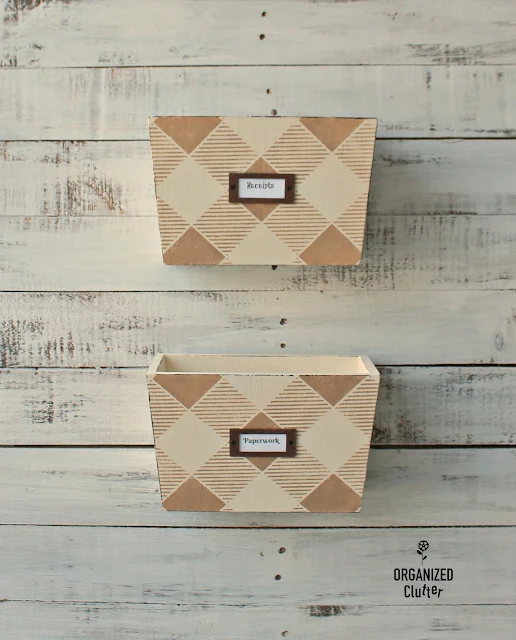
Thrifted and Upcycled Office Wall Bins
January 01, 2018
I have a new blog design. It's not quite done yet. It will get a bit more tweaking this week.
I had a blog emergency the other night and almost lost it. Anyway the new design will be much more minimal, and light. I am lightening up my house as well!
I found this wooden wall mail/file organizer at the thrift shop recently.
It has three wooden bins, all equal in size. What drew my attention to the piece was the drawer labels on each bin! I often add them to my projects.
The first thing I did was remove the backer board. All of the bins were attached to it with screws.
I plan on keeping two of these bins for my desk area so I painted them with Annie Sloan Chalk Paint in my favorite Old White. It took two coats to cover the darker stain.
Since this was not an antique or older wood piece, I didn't base coat with Zinsser Primer or Zinsser shellac. I didn't think I would have trouble with stain bleeding through the paint.
I removed the drawer label holders before painting and stenciling.
I used my buffalo check stencil (from *Old Sign Stencils) on the diagonal to add a pattern to the front of the bins. Again! Yes I used it again! It's just so fun!
I chose Ceramcoat Acrylic Paint in Trail Tan as my stencil paint. It is very close to the color of burlap.
Instead of distressing the bins with sandpaper, I opted to use my FolkArt Layering Wood Block with Ceramcoat Acrylic Paint in Walnut Noyer
 to faux distress the edges.
Just squirt some Walnut Noyer on a paper plate.
Just squirt some Walnut Noyer on a paper plate.
I used to apply paint to the whole block with a sponge brush but after many uses I discovered I only needed to apply it one side to distress the edges of my small projects.
Every once in a while the layering block slips and you get paint where you don't want it.
Just touch it up with your base coat and run your layering block over the edges again.
I just added a thin line of paint along the edges. It adds definition and dimension.
To seal these bins, I used Minwax Paste Finishing Wax in Natural . Since these bins will not get wet or dirty, the wax should work just fine.
I think Minwax paste wax is much easier to apply than Annie Sloan Clear Wax. I didn't even use a brush to apply the Minwax, usually a piece of paper towel will do, or an old lint free rag.
I think Minwax paste wax is much easier to apply than Annie Sloan Clear Wax. I didn't even use a brush to apply the Minwax, usually a piece of paper towel will do, or an old lint free rag.
I printed card stock name tags for the drawer label frames, using Picmonkey.
I plan to use the third bin for a different project, but now that the bins are separated they can hang either horizontally vertically above a desk.
I added sawtooth hangers to the back of the bins for hanging.
Buffalo checks are not just for black and white, or red and black! I love them in other palettes as well.
*Old Sign Stencils provided me with complimentary samples.
All opinions about these fabulous products are my own.
The bins will be joining my other white/tan buffalo check projects on my desk.

Sharing is caring


Yet again, another awesome make over! Love the theme with your desk items.
ReplyDeleteI might be late getting to the party, but what is layering wood block? Do you have a post with more info?
ReplyDeleteMore info on layering block: http://www.organizedclutter.net/2016/11/vintage-colonial-style-end-table-up.html
DeleteWhat a great find! I love how your bins turned out, Carlene! Your new header is just fabulous!
ReplyDeleteHappy New year to you and your family!
A friend of mine gave me TWO of these in different sizes. I didn't even think of separating them. EXCELLENT idea!!
ReplyDeleteI bought your stencil but haven't used it yet. I love all your ideas. Thanks for another great one.
ReplyDeleteWOW, I just love the look of these! Great job!
ReplyDeletePam
scrap-n-sewgranny.blogspot.com
Outstanding. Seriously. I'm eyeing up anything and everything to do this paint treatment on. I LOVE your colour choices and pattern so much! Thank-you for always so generously sharing the stencil info!
ReplyDelete